2016年12月13日 星期二

【scrapbooking】joy+moments


來新加坡後每一年都會特別去烏節路看看美麗的聖誕裝飾
雖然每次都被恐怖的人潮嚇到
但還是無法抵擋想去拍照的心啊!
很愛烏節路上藍白色系的聖誕裝飾

不但跳脫了傳統的紅配綠
清爽的設計感覺替32℃的十二月也稍稍降溫一些!


Winter Christmas theme; Tropical weather!

Happy holidays to all my friends!!

We immersed ourselves in the festive moment at Orchard Central 
during our annual visit to Orchard Road for Christmas decorations! 

Here is the video of how arranging all the cards and photos together!


======================【scrapbooking小撇步】======================

1.

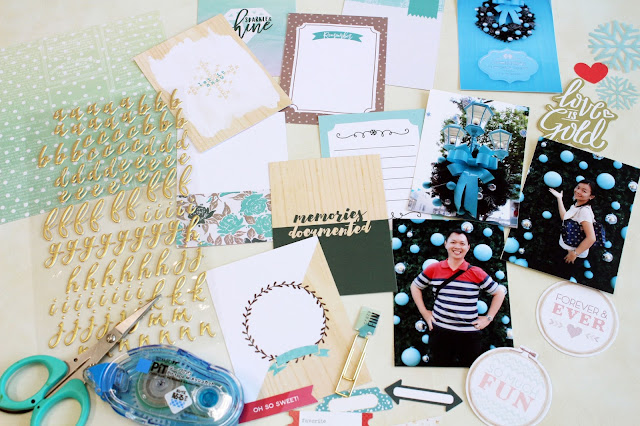
好愛cocoadaisy 設計的project life圖卡
挑了這些和照片色調相近的小卡開始加工囉!
除了上面youtube的製作過程影片連結
這裡也放了幾張步驟圖喔!


2.
最有趣的就是幫這些圖卡加上裝飾
簡單的蓋印或是貼上亮片
拼貼一些適合主題的小標題
都能製作出獨一無二的小卡喔!


3.
利用同一系列的紙張和配件
同時也完成了這一頁12吋相編
這樣就能有同色系的對頁囉!


4.
papers: cocoa daisy/ crate paper/ pink paislee
stickers: maggie holmes
 die-cuts: cocoa daisy
sequins: cocoa daisy
mist: heidi swapp

2016年11月16日 星期三

【scrapbooking】coffee time


幾乎每次在樟宜機場候機
就會忍不住跑去買個甜甜圈配上一杯熱咖啡
這款打卡造型的甜甜圈是我的最愛
實在可愛到捨不得吃啊!

We usually have coffee and donut 
while waiting to board on plane at Changi Airport!
The map-pin donut is my favorite.
Is it too cute to eat???

I Started making this layout few days ago,

and tried to take some photos of the step by step.

I love these journaling cards from cocoa_daisy so much

and what I tried to do is to have them all on my layout!

Am I too greedy?? 

I also have some punched tabs

and this is definitely my favorite punch!!

It's perfect with that paper, isn't it?
It looks very like a pocket page,
but I tried to add some stickers and embellishments between the cards.


=========================【scrapbooking小撇步】=========================

1.
實在太喜歡cocoa daisy這系列的小卡
不管是咖啡或甜甜圈圖案都讓人愛不釋手啊!
貪心的我實在無法割捨
最後決定利用project life的概念
把所有圖卡都擠進這個頁面啦!

2.
裝飾這些小圖卡其實是最有趣的部份
加上可愛的小貼紙或是手寫字甚至是小標題
都能讓整個作品有更多的細節


3.
忍不住勸敗大家的小標籤打洞器
實在是我的心頭好
搭配上Maggie Holmes這張紙張根本絕配啊!

4.
papers: cocoa daisy/ crate paper/ american crafts
printable: cocoa daisy
cut files: cocoa daisy 
puffy stickers: dear lizzy
chipboard: dear lizzy
stickers: simple stories

2016年11月13日 星期日

【scrapbooking】favorite


Mahota是近日來最愛去的一家複合式餐館
精緻的商業午餐沒有固定的搭配
全看當日主廚的決定
但也每每能夠在餐點裡嘗到驚喜
光是用心的料理又有均衡的營養就值得再次光臨啦!
當然也值得做成一頁相編啊! :D

Mahota is one of my favorite restaurants in SG.
The menu of lunch sets are different everyday.
It all depends on what the chef is going to cook!
However, every dish is such a beautiful work and absolutely delicious.
I'll definitely come again!

I love the paper with wood grain pattern which is perfect with my photos!
What I tried to do is to add some layers of papers and doily paper.
Also, some chipboard stars to represent this "five-star" restaurant! LOL
Finally, add my handwriting to look like a recipe book. 
I just love how everything works together so well.


======================【scrapbooking小撇步】======================

1.
挑了木紋底紙來搭配這系列的照片
雖然和照片裡木桌的色調仍有點不同
但就愛這樣溫暖的質感啊!

2.
利用零碎的美編紙張襯底
再加上蕾絲紙張增加層次感
也更有餐桌上的效果啊!

3.
利用相片框和小圖卡增加版面的細節
再放上星星厚圖卡代表這是我心目中的米其林五星 :P
擺上湯匙叉子的小配件
自己看了都覺得好可愛啊!


4.
這次稍微跳脫平時中規中矩擺放標題的方式
沿著右下三角形45度角斜放
整個畫面感覺也更活潑了些啊!

5.
最後加上手寫字記錄當天的餐點
好愛這樣寫在木紋上的效果
而且也很有食譜的感覺呢! 

6.
papers:crate paper/ pinkpaislee
chipboard: heidi swapp
die-cut: pinkpaislee
stamps: heidi swapp
letters: american crafts

2016年11月2日 星期三

【scrapbooking】loved this


當導遊跟著玩耍雖然每天都鐵腿
但是最可怕的是跟著吃吃喝喝
幾天下來竟然也胖了一公斤 XD
(這也算是一種職業傷害嗎??)
不過看到大家吃得那麼滿足
拍照也拍得很開心
減肥的事情就改天再說好了! :P

As a "part-time tour guide," 
I can't believe I just gained 1 KG in few days!!!
However, 
I'm so happy that both of you had fun taking photos
and love the local food, too!!

I love keeping my layout and the pocket page together as a spread.
What I tried to do is to match the colors with each other.
For example, I used the scraps to decorate those journaling cards.
Also, used similar elements on both pages, such as camera stickers.

The well designed journaling cards and papers are my favorite now!!!


====================【scrapbooking小撇步】====================

1.
花了一些時間切割這些紙張
真的有種補丁的感覺 XD
但是實在好愛這些不規則搭配的效果啊!


2.
厚圖卡英文標題一向是好物排行榜前三名
再加上箭頭.愛心貼紙妝點
就更顯得獨一無二囉!


3.
最後加上少許噴劑的噴灑
還有繡線和亮片的點綴
就能讓版面多些不同素材的質感!


4.
很少使用軟泡材質的貼紙
但是這些小圖案搭配在PL圖卡上實在好適合啊!
再加上零碎紙張.木質片和貼紙的裝飾
就更有變化啦!


5.
只要將這些小卡和照片"組裝"一下
就可以非常快速地完成一頁紀錄
搭配上左頁12吋大相編
就是一個完整的小旅行對頁囉!


6.
papers: american crafts/ cocoa daisy
stickers: simple stories
puffy stickers: american crafts
wood veneer: cocoa daisy
sequin: cocoa daisy
floss: DMC

2016年11月1日 星期二

【scrapbooking】you're my missing piece


深受奧立佛30分鐘上菜節目的影響
一直很希望可以和大家分享10分鐘做相編的影片!
結果沒想到短短1分鐘的影片
花了moon整整一個下午的時間+兩個晚上
在此特別感謝背後這個強大的團隊

Thanks to 

藝術總監:Mr.85
IT部門:Mr.85
動畫導演:Mr.85
金主:Mr.85

(基本上這是一個一條龍公司...XD)


This layout is supposed to be done in 10 minutes... 
However, I was trying to take photos of the step-by-step at the same time. 
It actually took me a whole afternoon and 2 nights to get it done! LOL!!
And I would love to thank my hubby,
who is the art director, IT personnel, and also the sponsor!!!
He helps me a lot to have this video done!! :D

Come take a look and scrap with me!


All the supplies are from Cocoa Daisy November kit "Sprinkles"!
Go check out what the Cocoa Daisy DT did!
---> "Sprinkles November 2016 Scrapbook Kit"


==========================【scrapbooking】==========================

雖然影片其實是由以下照片編輯而成
但還是放上來和大家分享一下簡單的步驟圖囉!

1.
挑選出適合照片的紙張和貼紙
其實這通常是最花時間的一個步驟
不但要回憶一下照片裡的故事
還要找出適合的紙張色調 :P


2.
越是簡單的sketch
越是耐看也越容易發揮
忙碌的時候就是需要這樣快速完成生活紀錄!


3.
平時儲備各種顏色的英文字貼紙是必要的 :P
這時就可以選出合適的色調拼貼出標題囉!
再利用同系列的貼紙加以裝飾
就能讓版面多些變化!


4.
 白色底紙是最近的心頭好
但有時看起來卻又顯得有點單薄
這時噴劑就是最好的點綴小幫手啦!


5.
為了讓版面多些變化
厚圖卡也是非常好的配件選擇
 局部的妝點就能增加一些層次感


6.
最後加上簡單的文字紀錄就大功告成啦!
歡迎大家一起挑戰10分鐘做相編喔!!


7.
papers: crate paper
stickers: simple stories
chipboard: american crafts
mist: heidi swapp


2016年10月31日 星期一

【scrapbooking】friends


謝謝兩位手作好朋友來訪
並且再次驗證愛相編的朋友喜愛拍照的程度無上限! :P
大太陽底下熱情依舊不減
三人瘋狂地在植物園跳拍+遠望
根本就是拍MV的規格了!
所以原定烏節路當貴婦喝下午茶的行程只能取消 XD
一整天下來雖然汗流浹背
但現在看到這系列照片
還是不後悔放棄了LADY M的千層蛋糕下午茶啊!

Thanks to my friends, Monica and Meggie, for visiting me!
We had a great time visiting some places in Singapore,
having some local yummy food,
and of course, taking A LOT photos together.
This is one of my favorite photos taken in the Botanic Gardens,
You can tell how hot it was,
but we still spent whole afternoon there!
  
About this layout, 
it was so much fun playing with these double side papers 
and so easy to use with each other.
Best of all, they are in soft and happy colors!


=====================【scrapbooking】=====================

1.
很少嘗試這麼粉嫩色調的顏色組合
完成之後卻非常喜愛這樣的清爽配搭
也算是緩和拍照當日的酷曬啊!

2.
這次利用多張雙面紙來玩這個九宮格的頁面
彼此相互搭配兩面都用上
就不會覺得可惜了另一面的圖案囉!


3.
圖卡包裏有不少透明塑膠片配件
為了不想露出黏膠的痕跡
所以改用訂書針來固定也有另一種效果喔!

4.
最後加上一些噴劑噴灑的效果點綴
以及手縫線的幫襯
就可以讓整個版面有更多有趣的小細節囉!

5.
papers: pinkpaislee/ Teresa Collins
die-cuts: pinkpaislee
chipboard: crate papers
stickers: simple stories/ heidi swapp
mist: heidi swapp
floss: DMC 

2016年9月30日 星期五

【scrapbooking】penang-beach time


在檳城峇都丁宜(Batu Ferringhi)的海灘待了三天
有時只是坐在海邊放空
有時下去踩踩浪感受一下海的氣味 
這樣悠閒的時光卻總是過得特別快
只能趕緊留下這拍上沙灘的細碎浪花當作留念啊!

We stayed in Batu Ferringhi for three days doing nothing,
but sitting by the beach and relaxing!
This is one of our favorite photos.
I just love taking photos of our feet so much!

A friend was sharing this sketch she found from the Internet the other day.
I love those circles and wanna give it a try.
However, I turned the sketch and changed a little bit 
to keep my photo and title to be balance. 
Also, I added some more dots with mists and stickers to match those big circles, 
and I just love how they went together!


===================【scrapbooking】===================

1.
謝謝文芳分享這個美麗的Sketch
好喜歡那幾個大圈圈的效果
雖然找不到原始出處但還是決定動手嘗試一下!
找不到合適的照片只好旋轉90度來搭配手邊的4*6橫式照片


2.
挑了一些夏季主題的圓形圖卡和貼紙來搭配
根本就是在自己的材料堆裡尋寶啊!
最後還是忍不住放上一雙夾腳拖呼應我們的照片!
感覺也更夏天啊!


3.
買了很多年的底片特殊紙也派上用場
剛好用來當作簡單的襯底
也讓版面看起來多了些層次感!

4.
papers: basic grey/ bo bunny/ echo park/ simple stories
stickers: simple stories/ echo park
chipboard: american crafts/ me and my big ideas


2016年8月23日 星期二

【scrapbooking】penang- vintage


檳城觀光規畫得相當完善
不僅有美食地圖還有免費的市區巴士可以搭乘
最重要的當然還是壁畫地圖
可以按圖索驥找到自己喜歡的景點拍照
其中最有名的就是這對騎腳踏車的姊弟啦!
其實旁邊排了一大長串等著合影的觀光客們
我們當然是隨時準備好拍照姿勢呀! :P

This is the most famous street art in Penang.
Actually, there is a long queue waiting for taking photos!!
Of course, we're ready to pose!!! LOL

I do like playing with mixed media, but feel so lazy to clean up!
However, trying this watercolor-look background by using distress paints is so much fun!
The light blue is exactly what I want!
It looks perfect with the transparent tag!!


=========================【scrapbooking小撇步】=========================

1.
雖然一直很喜歡多媒材的效果
但是想到要清理後續往往就偷懶啦!
這次決定只拿出distress paint和噴劑
收拾善後就不會太麻煩啦! :P


2.
很喜歡利用distress paint製作出來的渲染背景效果
疊上透明的tag和葉子刀模裝飾
就顯得更有層次感呀!


3.
因為照片斑駁的牆面
讓人忍不住挑選了灰色調的紙張和配件
試圖呈現一些輕復古的感覺


4.
最後補上一些噴劑和珠光寶珠貼紙
以及黑色的英文字大標題就完工啦!
(其實這個V是轉了90度的Z啊!!! :P)


5.
papers:pink paislee/ american crafts
die-cuts: crate paper/ pink paislee
chipboard: crate paper
enamels: kesi art
die: paper smooches
letters: american crafts
mist: heidi swapp
distress paint: tim hotlz